

What is Visual Novel Reader?
- Visual Novel Reader helps adding soft subtitles to PC visual novels without the need of hacking and patching.
- This wonderful program was created by Jichi at Sakuradite.
- People could easily add translations, and it is hosted online (cloud).
It is not designed for any emulators, especially PSP emulators.As of July 2014, VNR now works with ps2 emulators, wii as well as PPSSPP,- It’s primarily a translation tool for translators to submit their translation and it is a software to translate a visual novel if you don’t know how to read JP language.
- If you are using Visual Novel Reader but you are not a translator, do not expect a perfect translation if you are choosing “Machine translation” from ATLAS and GOOGLE. That should be obvious. but there are ways to improve machine translation.
- To find out if a translator has picked it up as a project, proceed to otomehearts (for otome games) .

About this tutorial
This is an update to my old VN Reader tutorial. Many people screwed up in the registration, logging in and adding subtitles, so I’m being very detailed about this. Please pay extra attention. If you need help that is not covered in this tutorial, there are links below for your convenience.
- Level: Basic
- Rev: 5.0
- VNreader version used: 1/2/2018 (Dangetsu Mod)
This tutorial is also available in the following languages:
- Vietnamese – by Ushiromiya Beatrice
Update :
- 3/ 21 / 2014 Advance tutorial added [x]
- 5/22/2014 Updated guide for the non-translators
- 7/11/2014 Re-directed users to VNR official forums for support and feedback instead.
- 8/6/2014: Vietnamese translation by Ushiromiya Beatrice.
- 10/2/2015: Updated to the latest VNR version
- 1/2/2018: Updated to the new VNR mod. Please delete the old VNR and instead download the latest version at vnr.aniclan.com.
Chapter 01: The invitation
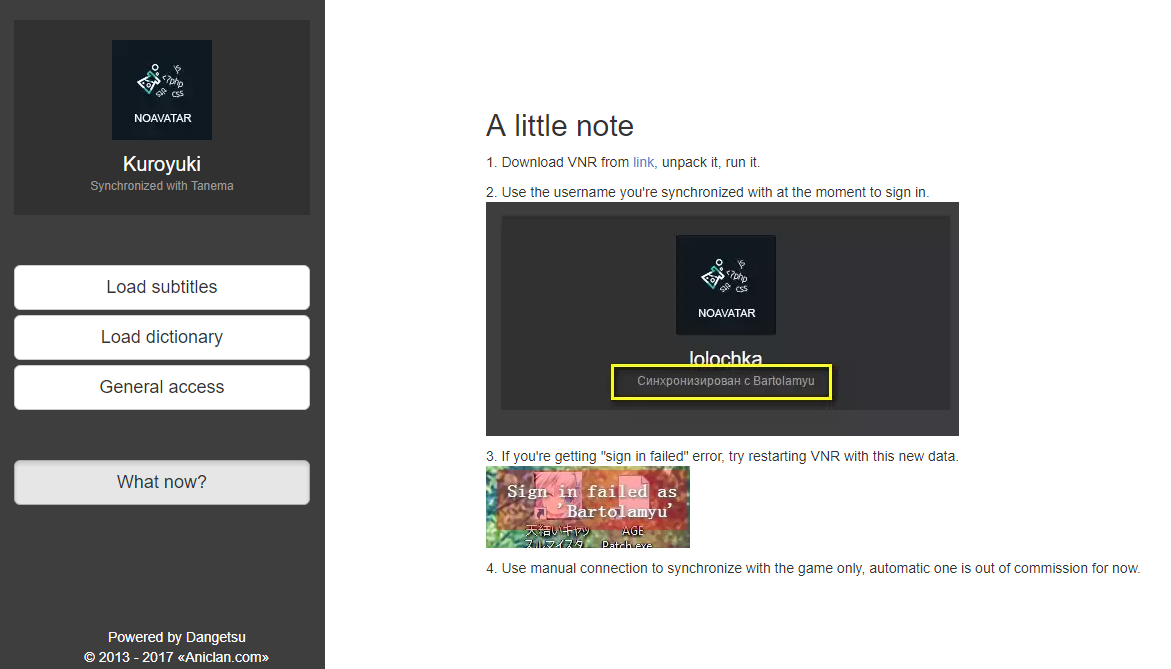
1.)Create an account at VNR@Aniclan. Click “Create Account”. In the registration Language field select “Aнглийский” for English language or “мандарин” for Mandarin. The site will ask if you have an existing sakuradite account (the old VNR site), if yes, then it will sync, if not then it’s fine. Do note that if you register with an existing sakuradite account, use a new username. Your old username is still in the database for record keeping so all you need to do is use a new username.

2.)After registration you need to sign-in. Notice that there is a “What now?” section in the sidebar navigation. Click the link to download the latest VNR version.
3.)Download and install ATLAS version 14 and LEC version 15.
To use the ATLAS activation/crack, change your computer date to 2014, replace the file in the crack folder to the installation directory. Run ATLAS then exit. Update the computerdate to the present afterwards.
4.)Open the Visual Novel Reader folder.

Chapter 02: Your destiny
![]() Before I could introduce you to all the functions of VN Reader; We must first prioritize on updating the program so everything would run smoothly.
Before I could introduce you to all the functions of VN Reader; We must first prioritize on updating the program so everything would run smoothly.
1.)Double click “Update.exe” and follow the instructions to update. It’s usually press any key to continue. This takes a while, depending on your internet connection.
2.)When the update is done, double click “Visual Novel Reader.exe”
It would take a while for the program to start up, have patience. Clicking everywhere might crash the whole thing.
3.)This is the “Spring Board“.

4.)Right click on the Spring Board and click “Update Game Database” then “Update Shared Dictionary”. There will be notifications on the right side if the update is done.

5.) Now click ![]() to open the preferences window and make sure you are following my settings. Or you can customize if you are already a pro
to open the preferences window and make sure you are following my settings. Or you can customize if you are already a pro


6.)We need to identify ourselves as a fansubber/translator/dictionary helper. Click ![]() and log-in using your Sakuradite account.
and log-in using your Sakuradite account.

7.)Choose the language you want to work on. I chose “English” because I do Japanese to English translation. Close the preferences window.
8.)A notification will appear on the right side of your desktop afterwards.

Chapter 03: The wizard
It’s time….. to add your first game/ translation project to the cloud~
1.) Go back to your “Spring Board” and click the “Game Wizard” icon.![]()
2.) Click “Next“. Now before proceeding, it is better to have your game already running, so go back to your desktop and open your Otome Game or any Japanese Visual Novel, skip the brand credits and cool song/movie opening until you reach the games’ Title Menu Screen. Do not play in full screen.
3.)Go back to the ”Game Wizard” and choose “Select the window of the running game (recommended)” then click “Next“.

4.)Click “Start”. Select the game window of your visual novel. Click “Stop”.

5.)If the result of the game window is “Found” click “Next”. If not, use another method like selecting running process or selecting the game directory itself.
6.)Confirm the game information by clicking “Next“.
The Game wizard will now synchronize with your game, if it is successful, click “Next“. It will then search for the game settings online–it copies the settings of other players who started the game before you.
 |
 |
| Synchronizing spells | The wizard thinks you have potential |
7.)But wait, what if there was no online settings found? Select text thread dialogue should appear.

8.)Skip to the part where characters are talking and match the detected game threads to the game. Click “Commit” and you’re done.

Chapter 04: The Grimoire you make
It’s time to post your translation! But if you’re not interested in translating, proceed to Chapter 04.5:The commoners manual.
1.) The game window should now look like this.

2.) Let’s call that blue menu on the right side “Side Controls”. You hover your mouse to the left side of the game window to hide/unhide it.
3.) Click on “Sub” on the “Side Controls” , and something should appear below. This is the “Comment Input Bar”. This is where you shall type and submit your translation.
4.)Proceed to the part where the characters are talking. That black box above your character is called the “Subtitle Box”.
This is where your translation would appear after submitting, as well as the text of the character who speaking.
5.) Type the translation in the “Comment Input Bar”. Select “Subtitle” from the dropbox and hit “Enter” key. Do not select Danmaku please….unless it’s a sound effect. This is a common mistake for translators.

From now on, use the Springboard. It will summon your Visual Novel with Visual Novel Reader. To put it simply, the Springboard is now your desktop for your Visual novels.

Want to learn more features of VN reader? Check the new tutorial here.
Chapter 04.5: The commoners manual
In this section we skipped how to add translation and merely use VNR as a translation tool. This is for the common folk.
1.)The game window should now look like this.

2.)Let’s call that blue menu on the right side “Side Controls”. You hover your mouse to the left side of the game window to hide/unhide it.
3.)Go back to your game, proceed to the part where the characters are talking and a black box will appear above. Call it “Subtitle box”. This is where all offline translations and user-submitted translations will appear. You can move it by clicking and dragging the space beside the music note.
 |
 |
| Moving the box | That was quite simple eh? |
4.)You’re done~ Enjoy playing. If you want to know how to customize the subtitle box check out the advance tutorial section. [1]
Chapter 05: Everything not according to plan
1.) I can’t see the subtitle box/ How to add H-code/
This usually happens if the visual novel text is not detected.
1.1) Click the “Menu” in the “Side Controls”. Click “Text Settings”
For complicated game setup like Dot Kareshi that requires an H-code, add the H-code by clicking “Edit H-code” tab. This would appear. Note that the latest otome games dont need this.

1.2) Go back to your game and proceed to the part where characters are talking, now go back to the “Text Settings”
You’d see something like this.

As you can see there are several boxes in the screen.
1.3) Choose the right box that contains the character dialogue by clicking “dialogue” and disable others by clicking “ignore”.
Check the “Keep all threads from the selected dialogue engine” and click “Save”
Congratulations, subtitles will now appear.
2.) I cannot register an account.
Go to Aniclan to register.
3.)I can’t see Japanese translation, only the game text is seen in the subtitle box.
In the side menu preferences > offline translation -make sure the check boxes are checked
In the side menu preferences > options >machine translation-should have a blue square.

Help and Support and Feedback
If you have problems in setting up VN reader, the official VNR forum is the place you want to go. {Here}
Go register for an account to post. Click “Topics” and create a thread there.
P.S.
I do not like people copy pasting this tutorial at their site/forum. I prefer, you link back to this tutorial instead.


Bro I can’t see Japanese translation, only the game the in game text is showing in subtitles window also I didn’t install those offline translator…is that the problem..??
LikeLike
Well people, seems you have to find an other translator, the VRN website isnt save (http instead of https) and the downloadable file on this page contains a virus.
LikeLike
sakuradite takes me to a differnet site
i dunnno did the website die?
LikeLike
Does anyone have a copy of the Vicon Jap-Eng Dictionary I could download? I can’t get it through the dictionary installer and it looks like Lingoes doesn’t host ANY of the dicts anymore… I’m pretty sure this is the only bit I’m missing before I can see translations so any help will be greatly appreciated!
LikeLike